Monday 14 November 2016

Trust failed error when browsing the Central Administration

In this quick post I am going to share an issue that I recently hit with one SharePoint Server deployment. While browsing the Central Administration I got below error when clicking on the Manage service applications page.


The key thing with this error is to know the background story, something I was missing.
The story is that this farm was migrated from one domain to another.
Everything was working fine the new farm was in production when we started to get this error.
There was one small detail that we were not aware of and it is that there was domain trust between the new and the old domain during the migration. This is why everithing was working fine until the network link between the old and the new domain was cut.
With this small detail the error below started to make sense. You will see this error in different .NET apps if the app is trying to do something with identity from a trusted domain but no domain controller from the trusted domain can be reached.

The trust relationship between the primary domain and the trusted domain failed.

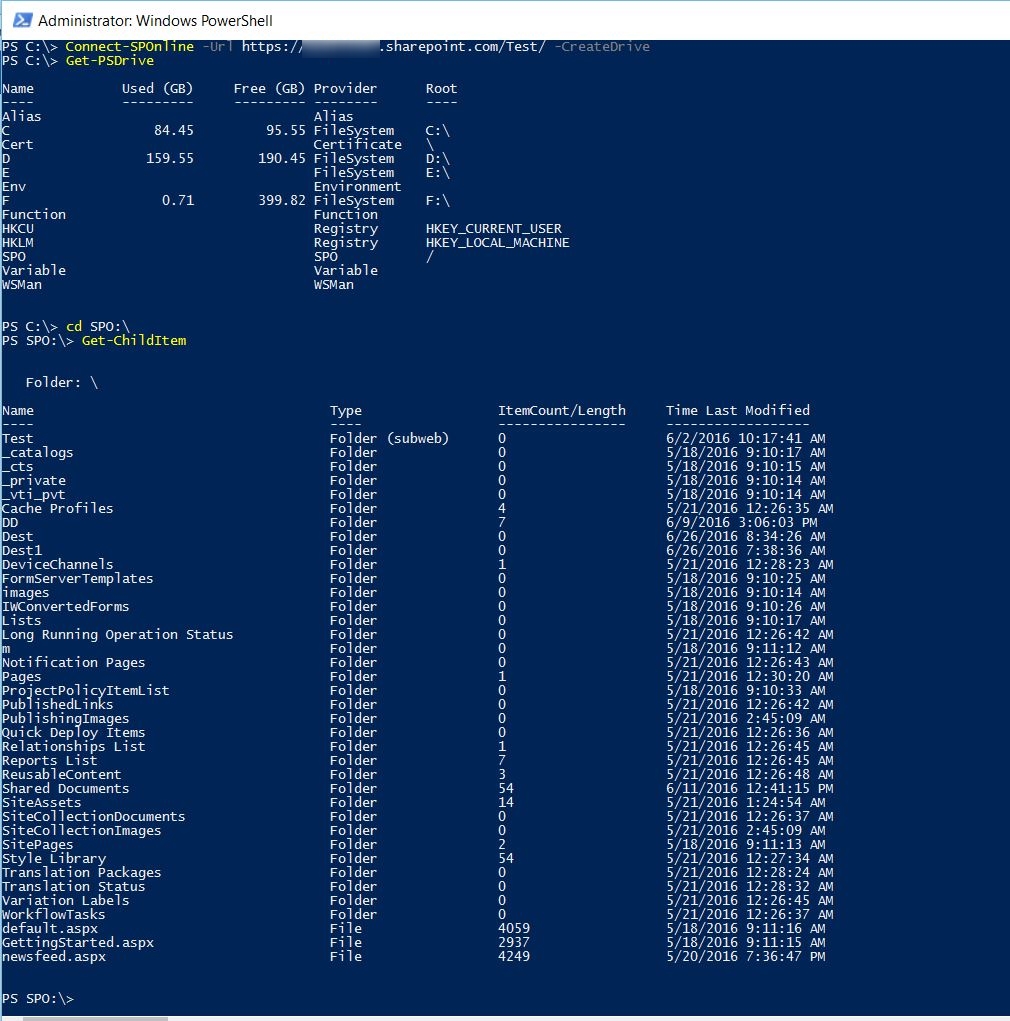
By looking at the "Delegated Administrators" I concluded that there are accounts from the old domain that have permissions over some of the service applications. I was even unable to get the service applications using Get-SPServiceApplication in powershell. It seems that there is some identity checking when we access the service application management page and it is failing because the trusted domain cannot be reached. The same exception can be reproduced if you try to translate username from the trusted domain to SID. The lines below are a good test to check if there is an issue with the trusted domain with PowerShell.

$userName = "DOMAIN\User"
$objUser = New-Object System.Security.Principal.NTAccount($userName)
$strSID = $objUser.Translate([System.Security.Principal.SecurityIdentifier])
$strSID.Value

Here are some of the things that might not work if you are in this situation:

- You will not be able to access the service management page
- You will not be able to enumerate the service applications in powershell
- In my case the Search and UPA was the SAs with administrators from the trusted domain and you will not be able to restart the service instances
- The UPA might stop working working completely
- If you clear the configuration cache the Timer Service will fall in a loop of rebuild attempts and crashes and no timer jobs will be executed.

As you can see this situation might not be a good place to be :).
The solution to this will be to restore the connection to the trusted domain and I am talking about a physical availability to a DC from the trusted domain or just remove the trust from the current domain. Sometimes the second solution might be the only possible solution, or just maybe this relationship was just not removed by the domain admins when the connection was cut.
If you remove the domain trust the error will be fixed and the translate method in powershell will fail with "Some or all identity references could not be translated." which it seems is handled better. Than you will be able to do some proper cleanup, if you wish.
I hope that this post was helpful! 

Tuesday 8 November 2016

Run PowerShell script on Windows 10 PC through the MDM Channel in Intune

In the last couple of weeks I've been working on an internal project that includes software distribution of Windows apps on MDM enrolled Windows 10 PCs using cloud only Intune deployment. Yes that's right, no SharePoint in this post, but a real world EMS story.
The easiest way to publish classic windows apps on Windows 10 PC that is MDM enrolled will be by publishing Windows Installer through MDM (*.msi) installer.
The important thing with this installer type is that the installation should go without any user interaction required especially when you use "Required Install".
The issue I hit is related to Dell software that is essential for the remote work and almost everyone in the company is using it. However for some reason the software publisher (Dell Software) is considered not trusted in Windows 10. There is this great thing in Windows (since Win 7) called SmartScreen that will pop-up a question asking if we trust the software publisher, before running executable with not trusted publisher. If we manually install the software we are clicking Yes and everithing is fine, the signing certificate is added to the Trusted Publishers certificate store.
However, when we are deploying the package over Intune this issue will cause the installation to fail with exit code 1603.
The way to fix this is to extract the signing certificate and install it in the Trusted Publisher on the target computer or to turn off SmartScreen with a policy, but the second is not a good security practice. The issue is that we cannot deploy cert to the Trusted Publishers store using Intune configuration policy.
My solution is to use PowerShell script that will be deployed and executed over the MDM channel.
The issue is that Intune does not support direct script deployment. There are some articles on the net that are demonstrating how to package batch script in self-extracting executable using IExpress.
However we need to wrap PowerShell script in MSI package suitable for MDM deployment.
I think that this is a very useful technique and I will try to put all the peaces together in this post, so you can deploy and run every PowerShell script on Windows 10 MDM PCs.
The easiest(and free) way to do this will be to create a self-extracting exe with IExpress, wrap the exe in MSI and publish it to Intune.
In order to reliably wrap the PS script in exe I used a script that I found in the TechNet Gallery called Create-EXEFrom.ps1. It will do a really good job wrapping the PS script and you can also add additional files in the package, like in my case I will need Dell Software certificate that should be installed on the target machine. Below is an example line for wrapping MyApp.ps1 script (this will be name used in all sample code) including the certificate we need.

.\Create-EXEFrom.ps1 -PSScriptPath "C:\MyApp.ps1" -SupplementalFilePaths "C:\Certificate.cer"


The exe will be created in the same folder and will be called "MyApp.exe".
The tricky part is that our exe and msi package should also be executed without any interaction required, including bypassing of the SmartScreen. This can be done by properly signing both packages with valid code signing certificate. In my case I have used the certificate that we normally use in bluesource for signing mobile apps. In order to sign the packages you can use the signtool.
If the signing is successful you should see below in your file properties and you should be able to run the exe without SmartScreen alerts.
Publisher Certificate

Now when we have signed exe we should wrap it in MSI package.
The easiest free way for me was to use WiX Toolset to do that. I put together really simple WiX project with only one custom action that will execute the exe. Below you can see the sample xml with the cmd commands I used to compile the WiX project.
If you are new to WiX  you should have your WiX bin folder in the PATH variable to make the cmd script work as it is. In my case it is "C:\Program Files (x86)\WiX Toolset v3.10\bin"(I know it is not the newest version).
Note that the package will be installed under the SYSTEM account and you should consider that in your scripts. You can find how to test MSI package in following article.
Next step is to publish the MSI as "Windows Installer through MDM (*.msi)" installer type as it is shown below.
Intune Publish MSI

The last thing that's left is to deploy the newly published app and maybe running some tests won't be a bad idea :).

I hope that this non-SharePoint post, written by a SharePoint guy will be helpful!

Friday 14 October 2016

Build slider bar graph date time search refiner with custom intervals

A couple of weeks ago I worked with a client that had this requirement for their search center in SharePoint Online. They had a repository with different research documents and these documents had a Publishing Date date/time field with values up to 30 years ago.
The client wanted to build a result page for this documents and have a slider bar refiner with custom intervals up to 10 years ago. 
If we have a numeric based managed property we can specify a custom refiner interval like the one below.
Unfortunately the Custom option is missing for date and time datatype. We have predefined intervals that are up to one year ago and "Defined in search schema" which I am not sure what is suppose to mean, but this will be the error you will get if you select this option.

For this Display Template you must specify custom intervals for the values that will be shown. Please change the refinement settings to use custom intervals.

It really does not tell us much if you don't have an option to specify custom interval in the UI.
Luckily if  you export the Refinement webpart you can see more refiner settings. All selected refiners are represented as JSON and below are the settings of our Publication Date refiner(formatted).


There are two settings that grab the attention and they are highlighted in the picture above. They are "useDefaultDateIntervals", which obviously means if the default intervals that cover only one year should be used and "intervals" that should represent the custom intervals. After some research on the web I found that the intervals value should be array of integers that are representing the intervals in days. I came up with these intervals for my client: Ten Years Ago, Five Years Ago, Three Years Ago, One Year Ago, Six Months Ago, Three Months Ago, One Month Ago, 7 days Ago and Today. This will be set with flowing intervals value:

[-3650,-1825,-1095,-365,-180,-90,-30,-7,0]

The first step will be to update the values for "useDefaultDateIntervals" and "intervals". Set the "useDefaultDateIntervals" to false and for "intervals" use your interval array like the picture below.


Then you will need to import the webpart  and use it in your page. The result is below.


We have our custom intervals and they are working as we expect(at least with me). However we can see one big issue and it is that the intervals are not labeled appropriately. This should be fixed in the refiner display template.
As it is not a good practice or practical in this case to edit the out of the box display template I created a new display template based on the out of the box "Slider with bar graph".
In the new template I have specified values for the Label and the NextIntervalLabel of all "filter boundaries". In this example we are going to have 10 boundaries. NextIntervalLabel is used when you move the mouse over the bar and the Label is used for boundary label in the slider. You can see the entire template below.

On line 104 we can see how to get all boundaries and their values for Label and NextIntervalLabel.
After deploying and setting the new display template we can see that the labels are much more accurate.


There is small detail that should be updated and it is the start and end labels of the bar graph.
Unfortunately my solution to that is to change the text by selecting the elements by class name and this is not the most elegant solution if you have more than one slider bar refiners, in that case you will need to change the index number to get the correct elements. You can see the code below.

With this final touch this is how our custom slider bar graph refiner looks like.


It looks really cool and useful. If you check the refiner settings in the UI now you will see that "Defined in search schema" is selected. I found this misleading since I have done nothing special in the search schema.
I hope that this was helpful!

Tuesday 6 September 2016

Set Managed Metadata field value with PowerShell and CSOM

In the previous post I demonstrated an easy way to migrate managed metadata term store objects to SharePoint Online with PowerShell.
Now when you have migrated the terms you might need to migrate some documents and set the metadata fields in SharePoint Online. In the same project I had to migrate around 600 documents to SPO including the metadata which had 6 managed metadata fields, 4 of them were multi-valued.
In this post I will share a powershell snipped to make TaxonomyFieldValueCollection and use it as value for field of type Managed Metadata.
I am showing this method because I got some mixed results when I used simple string as value. It is hard for me to explain why simply updating with taxonomy string did not worked in all cases.
For example, if the document was created in Office Web Apps I was unable to set the fields using a simple string. You can try using the string method and then cross-check  if everithing is set, because if you feed only metadata string(multi-valued) or just guid(for single-valued) you might not get any error, but the field will be left blank.
The challenge for me in the "TaxonomyFieldValueCollection" approach was to create TaxonomyField object instance, because I had to use the generic client context method CastTo and PowerShell don't work well with generic methods. This is why I decided it is worth sharing this example. You can see the code below.

Now a couple of words about the string that is used. In the example above I am setting multi-valued MM field with collection of two terms. The string is in format "<int>;#<label>|<guid> " with ;# delimiter between the terms. The integer is the item id of the term in the Taxonomy Hidden List, if you are using the term for first time or you do not know this id you can use the default value "-1".
The label part speaks for itself, this is the label of the term and the most important part is the guid of the term. If something is wrong with the format of the string you will see below error message.

"The given value for a taxonomy field was not formatted in the required <int>;#<label>|<guid> format."


This method is working every time for all items. I hope that this was helpful!

Sunday 21 August 2016

Migrate SharePoint 2010 Term Store to SharePoint Online with PowerShell

Last week I worked with a customer on migrating one SharePoint 2010 site to a new SharePoint Online.
I can qualify the site as Knowledge Base designed for optimal discoverability of the documents that are uploaded. To achieve a good discoverability you will need some good metadata describing the resources. Many times the metadata that is used is actually managed metadata that needs to be migrated/recreated in SharePoint Online.
If you have 10 or 20 terms it will not be an issue to recreate them, but if you have 400 for example it will not be very practical to manually recreate all terms.
There are many powershell scripts out there to export/import terms, but the success rate and the complexity might vary. This is why I would like to share how I did it and it worked out pretty well for me.
For the purpose we are going use the custom cmdlets provided for free by Gary Lapointe.
For demonstration purposes I will export one term set group with one term set that has limited number of terms. You can check it out below, it also has some parent/child terms.

SharePoint 2010 Term Store

In order to export the term set group you will need to deploy the WSP that will add the custom SharePoint Server 2010 commands. By doing so you will add the additional 2010 commands directly to the Microsoft.SharePoint.PowerShell snap-in.
To export taxonomy object as xml we are going to use Export-SPTerms. You will need to supply some taxonomy object as input parameter, this will be a taxonomy session if you want to export everything, for more examples see the cmdlet help. You can see how the Legal term set group looks as  xml below.

Input XML

As you can see all essential information that is needed is exported, even some that will be an issue if you are importing the terms to a different environment or SharePoint Online. This is the Owner or every attribute that represents on-prem identity that you might have. The import command will also try to set this properties with the same values and it will fail because the identity as it was exported cannot be found. The way to workaround this is just to set different value for Owner that will be a valid Online identity. Now it is up to you to decide if you want to do this tradeoff and migrate the objects with different Owner than the source. Below are two lines (3 to make it fit better) that will take the content of the exported XML and will set new Owner for each XML node where the Owner attribute is not empty and later the same XML object can be used for input of the import command.

[xml]$termXML = Get-Content "C:\Legal.xml"
($termXML.SelectNodes("//*")) | Where {$_.Owner -ne $null} | `
ForEach-Object {$_.SetAttribute("Owner", "i:0#.f|membership|admin@MOD******.onmicrosoft.com")}

To import the taxonomy objects in SPO you will need to download and install the SharePoint Online Custom Cmdlets
This will actually install a new module called  Lapointe.SharePointOnline.PowerShell.
The command that we are going to use for the import is Import-SPOTaxonomy. For InputFile parameter we are going to use the variable from the above lines after we have set all identity attributes. If you are importing an object that is not a top level term store you should specify ParentTermStore(can get it with Get-SPOTermStore), if not you should switch on the parameter "Tenant". Before all that, you should connect to a site in your target tenant using Connect-SPOSite. Below are the lines to import the Legal term set group.

Connect-SPOSite -Url "https://mod******.sharepoint.com"
Import-SPOTaxonomy -InputFile $termXML -ParentTermStore (Get-SPOTermStore)

And this is it. Our Legal term set group is recreated and available in the entire tenant. One nice thing is that the GUIDs will be copied as well.

SharePoint Online Term Store

I hope that this was helpful and big thanks to Gary Lapointe for writing this great tools! The same approach should work for SharePoint 2013, but I have not tested this.

Monday 1 August 2016

Display related item repeating section in Nintex Workflow task form Nintex

Last week I worked with a customer that had repeating sections in Nintex Forms 2013 item form and Nintex Workflow 2013 workflow associated with the list. The customer had the requirement to be able to properly display the repeating section data in the workflow task forms. This requirement does not seems to be a straightforward to accomplish, but in this post I am going to demonstration that this is actually very simple and since I haven't found this in other sources I am sharing my solution and other useful links in this post.
The issue with the repeating section is that it is living as "section"only in the form. You can connect the entire repeating section to a field with type "Multiple lines of text" and you will see that our repeating section value is actually saved as XML.

Nintex Repeating Section

The item actually looks like this:

Nintex Repeating Section  Form

The first nice thing that is not directly related to the title of this post is to make the XML data looks better in List View. To accomplish this I am going to use the CSR (Client-side rendering) approach demonstrated in this post "Displaying Repeating Section as table in List View - the CSR approach". Adapting and applying the script to my list view gives me below result that is way better than the XML.

Repeating Section CSR


The way to make sense out of the repeating section in workflow is by querying the XML from the field. I will not go in dept since there are many resource on the subject. One thing that can help you in this task is this article "Nintex Forms/Workflow - Parsing Repeating Section Data" by Vadim Tabakman.
Now to the reason to write this post. If you have tasks in your workflow it will not be unusual you or your customer/users to want to see the related item properties right in the task form instead clicking on links. If you leave the form as it is, the best you can get is to view the repeating section as XML. You can edit the task forms with Nintex Forms for most of the task templates you will get a good starting point and all item properties controls will be created. However check out how this controls look like in three common tasks. From left to right Flexi Task, Request review and Request data.

Nintex Task Forms

As you can see the data from the repeating section is displayed as XML. Even in the "Request data" template where I have used "List item" control to display the related item. 
This was also the case with the customer, they had many "Request data" tasks and all of them were using "List item" control to display the related item.
The solution to this is very simple, just create a new repeating section in the task form, recreate all child controls by replicating the data type and the Name of the controls. Then connect the repeating section control to the related item field that contains the XML from the related item. Checkout how a Flexi task looks like if you recreate the repeating section as described.

Flexi Task Form


The data from the repeating section in the related item is represented as repeating section in the task form as well. Just make sure that the names of the controls are as in the original item, make the repeating section read only in the task form and you will be completely fine.
I tested the same approach in SharePoint 2016 and Office 365. However something interesting is happening with the XML as you can see in the screenshot below (the field is called Rep)

Task Form Office 365

The important thing is that the repeating section is visualized as expected. If I found what is happening with the XML might blog about it.
I hope that this was helpful! 

Monday 27 June 2016

Useful file handling commands in the SharePoint PnP PowerShell module

Last week I got a request from one of our customers to help them to move some of the files from one SharePoint library to another in different web. Sounds an easy and quick task, but the catch was that the library had ~ 12000 documents and 1500 folders and the customer also wanted to keep the Created, Created by, Modified and Modified by column values. The number of items that had to be moved was ~ 3500. Pointless to say that with such number of items the Explorer view is not working, the new OneDrive client does not support sync from SharePoint libraries yet and I still had to figure out how to effectively copy the metadata. The way to accomplish this is with PowerShell or with 3rd party migration tool. Since the customer had only this requirements and not migration of the version history for example, my weapon of choice was powershell.
In this post I wont to share a couple of SharePoint PnP PowerShell cmdlets that greatly helped me in writing my migration script. Bluesource is also a contributor to the PnP project, thanks to my colleague Pieter Veenstra.
The first thing I want to share is a new feature that came with the June 2016 release. It is the option to map SharePoint site as PSDrive. This is done at the begging using Connect-SPOnline with CreateDrive parameter. You will then get a PSDrive called SPO and a PSProvider also called SPO. See how it looks below.

As mentioned above you will connect to the site and you will be looking at the root web. The sub webs will be shown as folders. You can do many standard things in this PSDrive like listing items, copy, move and more. One thing I was unable to do is listing the items in lists with 5000+ items, it seems that the view threshold limitation is kicking in. The other thing is copy items from SPO drive to the local file system, this is because you cannot copy items from one drive to another if the PSProviders are different. Also it would have been nice if this SPO drive is persistent and you can access it in Windows Explorer, this is not available and I am not sure if it is possible. 
I did not used this in my script, but I think that it is nice to have and you can learn more about this and other improvements in the June 2016 Community Call.

Get-SPOFile - This is one very useful command that will help you to download a file by supplying the server relative url to it. This was easy task after I retrieved all items and their FileLeafRef and FileDirRef fields using the technique from my previous post

Ensure-SPOFolder - With this command you can get a folder by giving a web relative url to the folder. If the folder does not exist it will create it even if the folder is nested in other non-existing folders, they will be created as well.

Add-SPOFile - With this command you can upload a file by supplying web relative url of the folder, the file will be uploaded with the same name. If the folder does not exist this command will create it before uploading the file. Really nice command!

I hope that this was helpful!

Monday 20 June 2016

Get All Items in 5000+ large list with CSOM in PowerShell

Last week I had to write a script that needed to take all items in large SharePoint Online list.
By large I mean above 5000 items. This means that the list is above the list view threshold in SharePoint Online, which is 5000 and we cannot change that. The way to get all items in SharePoint Online is to use CAML query. However if it is just an empty query without any filtering it will fail, if you use unindexed column for filtering or ordering the query will fail, if you filter/order by indexed column and the query returns more than 5000 items it will fail again. The error in this and other scenarios is similar to the one below.

Exception calling "ExecuteQuery" with "0" argument(s): "The attempted operation is prohibited because it exceeds the list view threshold enforced by the administrator."

The way to workaround this is pagination of the view. This means that we will have a row limit of the result that the query can return that should be less or equal to 5000. Once we get the first 5000 items we can do another query for the next 5000 starting from the position where the first result(page) ends. This is the same with what we do in the UI scrolling foreword in the list view. Below is an example PowerShell snippet that will take all items from a list using 5000 items page size ordering the items by ID.

$list = $ctx.Web.Lists.GetByTitle($DocLibName)
$ctx.Load($list)
$ctx.ExecuteQuery()
## View XML
$qCommand = @"
<View Scope="RecursiveAll">
    <Query>
        <OrderBy><FieldRef Name='ID' Ascending='TRUE'/></OrderBy>
    </Query>
    <RowLimit Paged="TRUE">5000</RowLimit>
</View>
"@
## Page Position
$position = $null
 
## All Items
$allItems = @()
Do{
    $camlQuery = New-Object Microsoft.SharePoint.Client.CamlQuery
    $camlQuery.ListItemCollectionPosition = $position
    $camlQuery.ViewXml = $qCommand
 ## Executing the query
    $currentCollection = $list.GetItems($camlQuery)
    $ctx.Load($currentCollection)
    $ctx.ExecuteQuery()
 
 ## Getting the position of the previous page
    $position = $currentCollection.ListItemCollectionPosition
 
 # Adding current collection to the allItems collection
    $allItems += $currentCollection
}
# the position of the last page will be Null
Until($position -eq $null) 

Few word about the query, I am using RecursiveAll because I used it against library and I wanted to get all items in all folders, the size of the page is 5000, just on the edge of the threshold and I am ordering the result by ID because this column is always indexed.
I am using Do-Until loop to get all pages and setting the position to be the position of the last item collection that was retrieved.
This is really a powerful and quick way to workaround the annoying 5000 list view threshold. I hope you find it useful!

Sunday 12 June 2016

Disable SharePoint Event Firing in PowerShell process

Last week I worked with a customer that is using SharePoint 2010 as part of their enterprise DMS solution. Only a small part of the users are accessing the SharePoint sites directly, but they are accessing and adding documents using 3rd party Outlook integration product and in-house legacy LOB system integrations with SharePoint. If you have dealt with such DMS solutions(which is not uncommon in some industries) you will know that during the exploitation you might end up with a complex folder structures created based on the document metadata. You might also end up with large numbers of empty folders.
The empty folders are an issue for my customer and they reached me with a request to write a PowerShell cleanup script that will run on schedule and will delete the empty folders.
The catch is that there is an ItemDeleting event receiver that is preventing the deletion of any item including folders. You can see in my dev. machine a similar event receiver in action. It is also stopping the operation when I call Recycle() on item in PowerShell.


If you are a developer, most probably you know how to disable the event firing inside an event receiver in order to prevent the firing of other event receivers. This is done by setting the value of property SPItemEventReceiver.EventFiringEnabled. We can do the same thing in powershell with below code and prevent any events from being fired.

$assembly = [Reflection.Assembly]::LoadWithPartialName("Microsoft.SharePoint");
$type = $assembly.GetType("Microsoft.SharePoint.SPEventManager");
$prop = $type.GetProperty([string]"EventFiringDisabled",`
[System.Reflection.BindingFlags] `
([System.Reflection.BindingFlags]::NonPublic -bor [System.Reflection.BindingFlags]::Static)); 
#SET EVENT FIRING DISABLED.
$prop.SetValue($null, $true, $null); 
 
<#
 DO WHAT YOU NEED TO DO
#>
 
#SET EVENT FIRING ENABLED.
$prop.SetValue($null, $false, $null); 

This code will disable the event firing in the current PowerShell thread and I am able to delete/recycle any item without executing the event handler. I have tested this with SharePoint 2010 and 2013, haven't tested it on SharePoint 2016, but I assume that it will work there too.
This is very powerful technique use it carefully on your own responsibility. I hope that this was helpfull!

Sunday 15 May 2016

Pause a Nintex workflow for less than 5 minutes in SharePoint Server and Office 365 Nintex

Last week I spent almost 2 days fixing a complex Nintex/SharePoint 2013 issue with one of our customers. The customer was not very big in terms of headcount, but they were using Nintex workflow to automate all sorts of processes(one of the biggest I have worked with).
There were Workflow timer jobs stucking/failing, workflows exiting with errors for no obvious reason and more. The issue was resolved with a couple of fixes and at least the workflows were executed when they should and were ending as they were designed to.
Some of the issues and improvement points I flagged were: not properly scaled Nintex deployment, incorrect service topology, outdated product versions and poor workflow design.
Now, the fourth (poor workflow design) was partially dictated by the inadequate scale of the deployment. They were using a lot Pause and Commit pending changes actions. Many of the workflows were designed to have two minute pause after the first couple of actions.
As maybe you know the pause action actually pauses the workflow instance for the defined period of time, but the workflow will not resume immediately, it will be resumed when the "Workflow" Timer Job is executed. The default schedule of this job is every 5 minutes. This means that you cannot pause a workflow for less than 5 minutes or pause it for exactly the time you have set. You can change the schedule of the Workflow timer job to workaround the first limitation, but this can put additional load on your system.
This is why I demonstrated an alternative of the Pause action that do not pause the workflow instance, but just waits a certain amount of time before continuing the execution. I have not seen this approach in other sources and this is why I decided to share and explain it in this post.
There is another alternative to pause a workflow for less than 5 minutes. It is described in this article.
As you can see this alternative requires "NTX PowerShell Action". This is great, but this action is open source, it is deployed with Farm solution and although developed and published by Nintex Employee this addon is not backed and supported by Nintex. The PowerShell action is fantastic, but in my opinion it is not worth to deploy it just to use it as Pause alternative. Also you cannot use it in Office 365(SharePoint Online).
The PowerShell example works by executing the powershell code that will just wait a certain amount of time, then it will continue the execution. Obviously to pause a workflow we need to do some sort of waiting. There is no out of the box action that just waits, as we know Pause action is not doing anything, but actually idling the instance execution at certain point and waits for the timer job to resume it after the time is elapsed. With the powershell example we use the powershell (.Net) framework to achieve wating without doing anything for certain time. The same thing can be achieved with T-SQL statement execution and in Nintex Workflow both On-Prem. and Office 365 we have "Execute SQL" action.
If we want to put a wait in our SQL query for two minutes we can use the code below:

WAITFOR DELAY '00:02'

I am not a SQL guy and was surprised to find out that this statement works outside of the SQL Management tools.
Below is the designer look of my demo workflow in SharePoint 2013. This should also work for SharePoint/Nintex 2010.

WorkflowDesigner

As you can see it is pretty simple just for PoC. Below is the configuration of the "Execute SQL" action.
Execute SQL Action Configuration

I am using a connection string that is using "SQL" as server, this is alias to the SQL instance that hosts my SharePoint, I am using SSPI security with Windows credential that are actually my farm account saved as global constant.
Below are the details from the execution. You can see that Execute SQL actions took exactly 2 minutes to complete.

Workflow Execution Detail
Unfortunately you cannot use this approach on-premise  for pauses longer than 5 minutes without doing a loop and in this loop execute multiple times delays that are less than 5 minutes. If you do set delay more than 5 minutes the workflow will fail with error "Error performing database operation. Timeout expired.  The timeout period elapsed prior to completion of the operation or the server is not responding." even if you set connection timeout in the connection string to be more than the 5 minute delay. I will do some more tests/research and might report this as bug.

As described in the MSDN documentation of the WAITFOR statement, it should work against Azure SQL Database. In Nintex workflow for Office 365 we also have Execute SQL action. I actually tested this and noticed two things, the connection timeout you specified in the connection string will be set to 365 if the number is bigger than that, also if you set a delay longer than 4 minutes you will get some unexpected http errors during the execution, the workflow manager will do a couple of retries and then it will fail. I think that both are issues with the Workflow Manager in SharePoint Online.
This is not so important because the Pause action in the SharePoint 2013 workflows (Workflow Manager) are not depending on SharePoint timer jobs and you will not get the same pause issues as in on-premise 2010 framework, but it is still an option. See example configuration of the action below.

Execute SQL Office 365


My final words are that this might be extremely useful if you need to put some short pauses(not more than 5 min.) in your on-premise workflows. I hope you find this useful!

Wednesday 17 February 2016

Get a quick report of the SharePoint Databases with PowerShell [Tip]

Here comes another useful PowerShell one-liner I often use.
It will give you a quick overview of the SharePoint databases with properties like: Name, Server(Alias), TypeName, Web application name, Web application URL, Site collection count and the Size.
The size is actually the amount of disk space required for uncompressed backup. It might look something like a script, but actually it is a long and simple one-liner. You can see it below, I have used grave-accent(`) escape characters to fit it better in the blog. You can see it in one line here. Instead of piping to Format-Table you can generate CSV by piping to Export-CSV and later work with it in Excel.

Get-SPDatabase | Select-Object Name,@{Expression={$_.Server};Label="Server"},TypeName,@{Expression=`
{$_.WebApplication.Name};Label="WebAppLication"},@{Expression={$_.WebApplication.Url};Label="WebAppLicationUrl"}`
,@{Expression={($_.WebApplication.Sites | Measure).Count};Label="SC Count"},@{Label ="Size in MB";`
 Expression ={$_.disksizerequired/1024/1024}} |  Format-Table -AutoSize

Get SharePoint database report

Tuesday 16 February 2016

Get Application Pool Identity credentials[Tip]

In this short tip I am going to post a PowerShell one-liner from my list of extremely useful one-liners. It can get the the credentials of the IIS application pools identity.
I use it mainly in two scenarios:
  1. Imagine that you will do a remote work on customer where you have only temporary access and credentials. Many times the account that is provided is Farm Admin, has local admin permissions on the SharePoint boxes, however it does not have permission to use PowerShell against SharePoint(no Shell Admin). You can use this short PowerShell script and get the Farm account(STS is running under it), many times it is left in the local admin group and you can log in with it and do what you need to do. Not a best practice, but it is a massive time saver.
  2. Imagine that you are working on issue where you need to restart the User Profile Synchronization Service instance and you need the Farm account password. You can get it with this script.

In order to use it you will need to have local admin permission. I can confirm that it is working on IIS 7.5,8.0 and 8.5.

Get-WmiObject -Namespace "root\MicrosoftIISV2" -Class "IIsApplicationPoolSetting" | Select WAMUserName, WAMUserPass

Get IIS Application pool credentials

Monday 15 February 2016

Copy List Views in SharePoint and SharePoint Online with PowerShell

In the last couple of weeks I am working with a customer that mainly uses SharePoint Server as DMS(Document Management System). I had to move a large number of documents from one library to another   due to  corruption in some of the files caused by excessive use of unique permissions (~ 32 000).
In this post I will not talk about why you should limit the usage of unique permissions especial in big libraries, it's a long story.
As part of the work I had to copy many list views to the new library. I am not a fan of "Save as Template" approach, my solution was to use a PowerShell script and copy the views programmatically.
The script did its job and I thought that it will be nice to have something like this for SharePoint Online.
I was unable to find any ready script that can do this, so I wrote one.
Both scripts are doing basically the same thing, getting the source and destination webs, getting the source and destination lists, getting the source and destination View collections and create new view in the destination using properties from the source.
It was a bit tricky to load what I need and not making the script extremely slow with CSOM, since we cannot use simple lambda expressions syntax in PowerShell. My solution to this was to use a function written by the SharePoint automation superstar  Gary Lapointe. You can check it out in his article for ItUnity, where he explains how to workaround the limitation in PowerShell concerning the lambda expressions. I highly recommend to read the entire series dedicated on using PowerShell against SharePoint Online.
You can download both scripts (on premises and online) below. Please, Test, Rate and use Q&A section in the Gallery!


 Download On Premises script from: TechNet Gallery

Download SharePoint Online script from: TechNet Gallery